Objective - improving our file structure
Let's make sure everyone is starting with the same code. Here is the HTML page that we finished Lesson 2 with:
Creating a better file structure
We are going to create a structure so that our images, CSS and HTML are laid out in the same way that they would be on our web server, where we would upload our website.
The first thing that we are going to do, is separate our CSS from our HTML. Why? We've worked so hard putting it there, why would we want to move it? The answer to that, is that we might end up with lots - maybe even hundreds - of HTML pages on our website. Imagine if we wanted to change the colour of our H1 tag and our CSS was still in the HEAD section of our HTML pages, we'd have to change it on every single file! That's no good, so we're going to remove it from our HTML page and save it as a .css file in a folder that we are going to call "css".
First, create a folder on your desktop (that's where your index.html file is saved) called "css" (in lower case is good). Then, open your index.html file, highlight and cut everything starting and finishing with the STYLE tags. Create a new Notepad (PC), TextEdit (Mac) or Text (Chromebook) file and paste our CSS into that. Delete the STYLE opening and closing tags (we don't need them any more) and save this file as "cats.css".
Go back to your index.html page (it's a lot smaller without that CSS isn't it?!?) because now we need to link our new .css file with our HTML page. We do this by adding this code where our CSS used to be:
Check your web page is still loading and displaying correctly by refreshing your browser window.
We are going to do a similar thing with our two cat images. If you look at the code in our web page, the IMG SRC (or image source) is found on the Piccante website:
We are going to save these images locally, on our own device. Click this link cat.jpg and then Right-click or Control-click the image and save the picture as "cat.jpg" to a new folder on your desktop that you will name "images". Do the same for the cat2.jpg picture, saving it as "cat2.jpg".
Once we've saved the two pictures, we need to change our HTML so that the IMG SRC is looking for the images locally, i.e. on your device. We do that by deleting "http://www.piccante.co/" from the IMG SRC tags, so we are just left with this:
Refresh the web page and it should show the cat images along with all of our nice CSS styling that we have been working on. Any new images that we add to our website will be saved in the "images" folder on our desktop.
To summarise, your index.html code should now look like this:
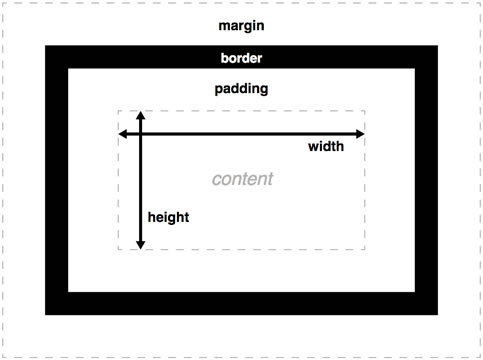
Thanks for listening in, stay tuned for our next lesson where we will cover element properties of padding, margin, border and width! Here's an image that might get you thinking about what this might mean.
CSS box model - padding, border and margin