
Objective - to create our first HTML page and view it in our web browser
So what is a web page? A web page is made up of code, which displays in a web browser to show us text, images, navigation menus, video, audio and many other things... all this can be done with HTML (HyperText Markup Language) and styled with CSS (Cascading Style Sheets).
So what is HTML? A series of "tags" that tell a web browser what the content of our web page is, and how it should be displayed. Search engines, like Google also look at these tags and the content so they can index web pages and show them in search results.
Here is an example of how a top-level heading tag would look:
Paragraphs make up a lot of the text on webpages. Here is how a paragraph tag could look:
You might notice that these two types of tags have a closing tag, (the forward-slash followed by the greater-than symbol) this is important to make sure our page displays correctly. Some tags, such as image tags don't have closing tags - these would appear like this:
Setting up our first HTML page with a text editor
One of the challenges the kids had to overcome was how to type up their first HTML file because we had a range of computers - PCs, Apple Macs and Chromebooks. Most kids or beginners won't have Dreamweaver or HTML editing software installed on their devices - that's fine - we can create HTML files using basic text editors and we are going to call this file "index.html" as that is the default "homepage" that a browser will look for.
Chromebook users
Open the Text app from Launcher and save a blank document as "index.html" to your USB drive (there is no built-in file storage with a Chromebook).
PC users
Open Notepad and save the file as "index.html" to your Desktop.
Apple Mac users
There are a couple of extra steps for the Mac to ensure that our text editor isn't going to do weird things with our HTML. Open the TextEdit app. Go to the menu TextEdit > Preferences and in the New Document tab select "Plain Text" (under Format) and under Options uncheck the boxes for Smart quotes and Text replacement.
Click the Open and Save tab and check the "Display HTML files as HTML code instead of formatted text" (under When Opening a File). Close the Preferences window and click "New Document". File > Save and enter "index.html" as the filename and save it to the Desktop. Phew.
We're going to put our index.html file on our Desktop on PCs and Macs for this lesson for simplicity - later we'll talk about file management and structure.
Coding our first HTML page
We need to set the !DOCTYPE declaration on the first line of our file to tell our browser that it is dealing with an HTML file and create the structure by adding HTML, HEAD and BODY tags to the page. Here's how your index.html file should look when you've finished. (I've left a line in between the opening and closing head and body tags as we're going to add some content there in the next step.
Now we've set up the page, let's add some of those tags after the opening body tag, but before the closing body tag. When you've finished your HTML file should look like this:
Now, let's save your index.html file again with the changes you've made and you're ready for the next step - viewing it in a web browser!
Viewing your HTML file in a browser
Chromebook users
Open Files App. Find your HTML file on your USB drive, ALT-Click and Open With "View"
PC users
Find the file on your desktop and Right-Click, open with your web browser.
Mac users
Find your HTML file in Finder, Control-Click and open with Safari (or from the Desktop drag your file into Safari's URL area)
How your webpage should look
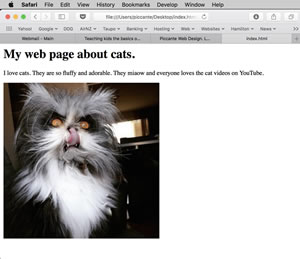
So far so good? Apart from the picture of that weird-looking cat, the page looks a little boring doesn't it? We're going to jazz it up a bit with some CSS, add some style "rules" to make it look more interesting. Let's start with a cooler font, say Arial Black. We are using Arial Black because it is a "web safe" font - and that means that the font is installed on just about every device and computer.
If we target the body element we are going to change every tag between the opening and closing body tags. That's fine, in this case, we want to change every bit of text to Arial Black. The CSS code goes between STYLE opening and closing tags and we put it in the head part of our file
Note that the curly brackets { and } are used to start and finish the styles that we are going to apply a declaration to the body element. 'Font-family' is the property that we are going to apply and "Arial Black" is the value. After the value, we put a semi-colon ;
Note, that if you make a mistake, even if just one character is wrong the browser will pretty well ignore your CSS rules and the style won't be applied to your webpage!
Note - we use the quote marks “ “ around the words ARIAL BLACK because there are two words in this font. We wouldn't need the quotes, if say, we wanted the font to be VERDANA.
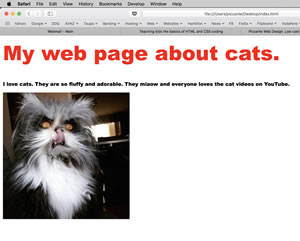
Save your HTML file and refresh your browser and you should now see the font has changed to Arial Black, a heavier style of font. How does that look? If you've got the heavier font displaying then well done!
That's all fine, but what if we want to be a bit more selective with our CSS rules? What if we wanted to ONLY change the style of one element, or tag? Let's say we wanted our h1 headings to be red, the rest of the text should remain in the default colour of black. We also want to increase the font-size (property) of our h1 heading to the value of 64 pixels.
We can achieve this by setting the h1 element colour to red and the font-size to 64px. Note that the CSS spelling is americanised, i.e. color, not colour. Each is finished with a semi-colon followed by a new line (just to keep things easy to read). Let's add this CSS code to the head section of our file.
Your HTML file should now look like this:
And when you've saved your index.html file and refreshed your browser this is what you should be seeing:
How your webpage should look
Hot tips
CSS is like any language, once you have learned many "words" you become fluent. But, here is a cool website that makes it easier to find how to change the properties of our HTML elements - w3schools.com.
Homework for the HDS kids!
Your challenge is to add a second-level heading (h2 heading) after the h1 heading that says "Cats are cool". This heading should be styled with CSS to be blue, 50px in size and, let's see if we can make the font style in italics! (Hint - you might need to check the w3schools link and look for font-style property to make your font show in italics).
How your webpage should look when you've done your homework correctly!

How did you get on? Here's the finished code...
In our next lesson we will look at creating a layout based on 'CSS Grid' - along with changing our file structure so it's better set up for adding more web pages to our site!
Next lesson